Magento is one of the most advanced eCommerce solutions with a variety of out-of-the-box features. Nonetheless, its power can be broadened with the help of extensions.
If your store runs on Magento, you will probably face the need to install a few extensions to add unique functionality that is not supported by default.
This guide will help you master the power of extensions. We are going to review the following points:
- main types of Magento extensions
- how to choose an extension for your store
- install an extension with Magento marketplace
- how to use Command Line to install Magento extensions
- how to install Magento extensions with Composer
Magento Extensions: Benefits and Main Types
What are Magento extensions?
Magento extensions are blocks of PHP code. This code is added to the website to extend the built-in functionality of Magento stores and bring in features that are aimed at different tasks. The vast majority of Magento-powered websites rely on extensions to provide users with a better experience and integrate their stores with third-party services and tools.
Magento extensions give the ability to create unique storefronts with custom features that are required by specific business needs. There are over 5,000 extensions available, both free and paid options. They can be downloaded with the help of Magento Marketplace, where they are divided between the most popular categories, or by the ones developed by third-party companies.
The main task of Magento extensions is to speed up the development process by decreasing the need for extensive coding.
There are three types of extensions that are available to Magento store owners:
- Modules – used to extend the capabilities of Magento-powered websites
- Themes – change the appearance of the store and its feel
- Language packs – allow adding a needed language to a storefront and admin panel
How to Install an Extension in Magento: Step-by-Step Process
If you already have a Magento website or are planning to build a new one, you will probably face the need to add a Magento extension to your store. There are a few approaches to the installation process, but before we move to this part, let’s find out the answer to another important question.
How to Choose Magento Extension: Important Aspects to Consider
How do I choose a Magento Extension?
Out of thousands of extensions available, it can be challenging to choose the one that will benefit your store without interfering with its performance. After you decide that you need an extension, it might be a good idea to keep in mind the main reason for its use. Do you want to enable a one-step checkout process? Or maybe you want to add more advanced products fileting? There are extensions for different business needs and purposes, and it is not difficult to find the one that will meet all your requirements.
At the same time, there is a risk that a Magento extension will take a toll on the performance of a store and even put its security in danger. That is why, when choosing a new extension, pay attention to the company that stands behind its creation. It is better to rely on extensions that are created by professional Magento development companies that ensure the high quality of code, compatibility, and smooth performance.
How to Install Magento Extensions: Magento Marketplace
As was previously mentioned in the article, it is possible to find extensions within Magento Marketplace. It is important to note that the marketplace was created and is managed by Magento and allows installing only the extensions that have been added to the marketplace.
Before you jump right to the installation process, it is important to remember a few simple rules that will ensure that the process will run smoothly and won’t interfere with business:
- install Magento extensions only during off-peak hours
- run your store in the maintenance more
- check it for readiness to install extensions and back up
Here is a step-by-step description of how to use Magento Marketing in order to install a new extension:
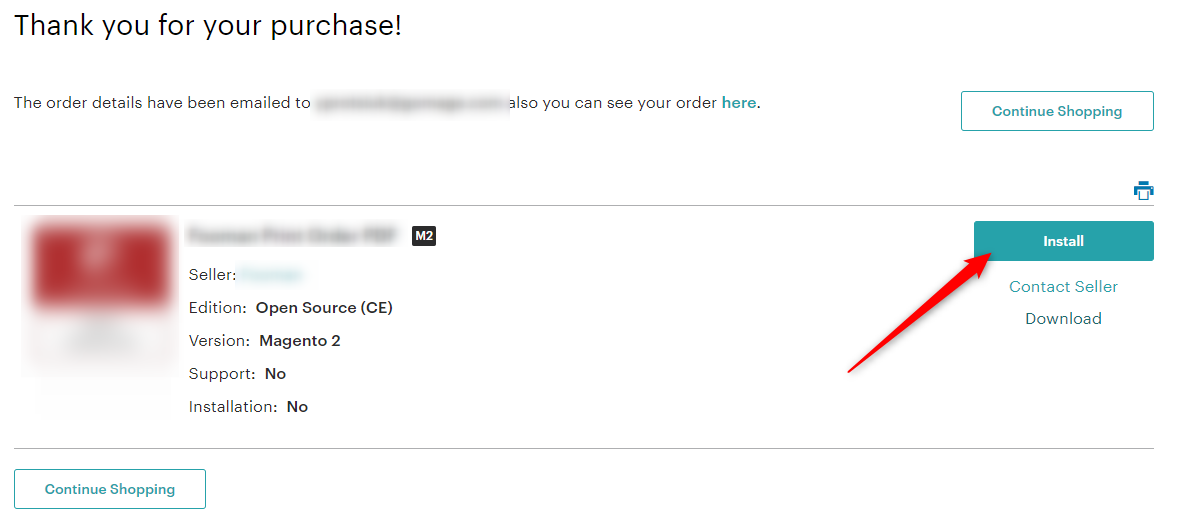
- Log in to your Magento Marketplace account and purchase the Magento extension that you would like to install.
- Once you’ve purchased the extension, click on the ‘Install’ option.
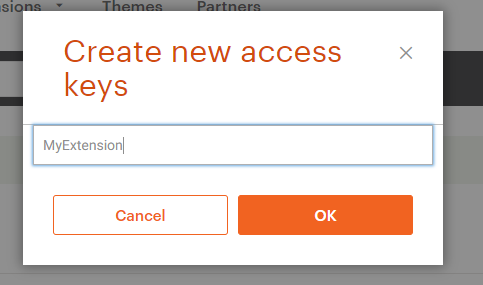
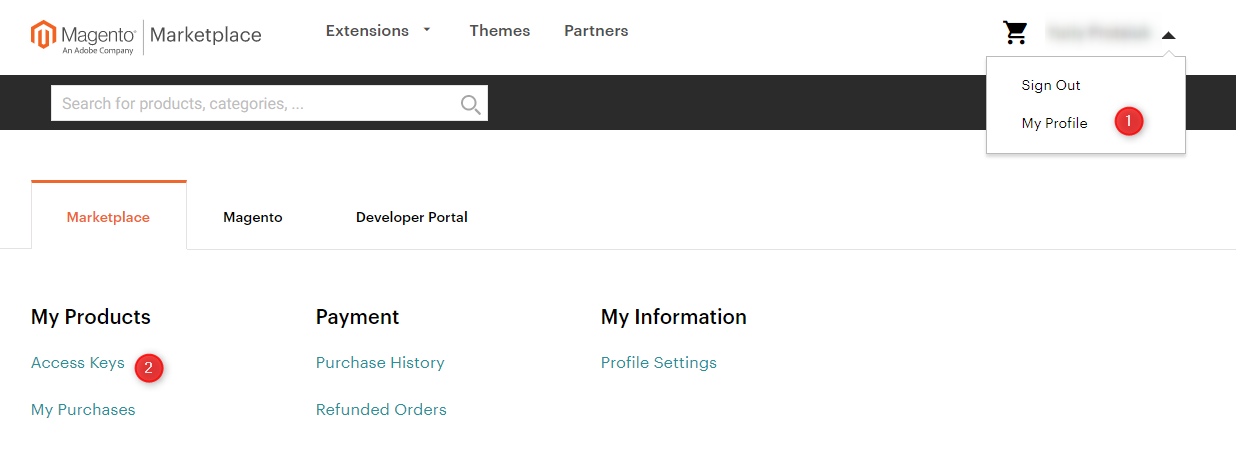
- You will be redirected to the Access Keys tab. Click on the Create A New Access Key button to generate a Private and Public key.
- Enter a name for your extension. The name should help you to distinguish the extension amongst other purchases.
- The Magento Marketplace system will then automatically generate the keys for you.
- Log in to the Admin panel of your Magento store. To perform the installation process, you need to have full administrator permissions.
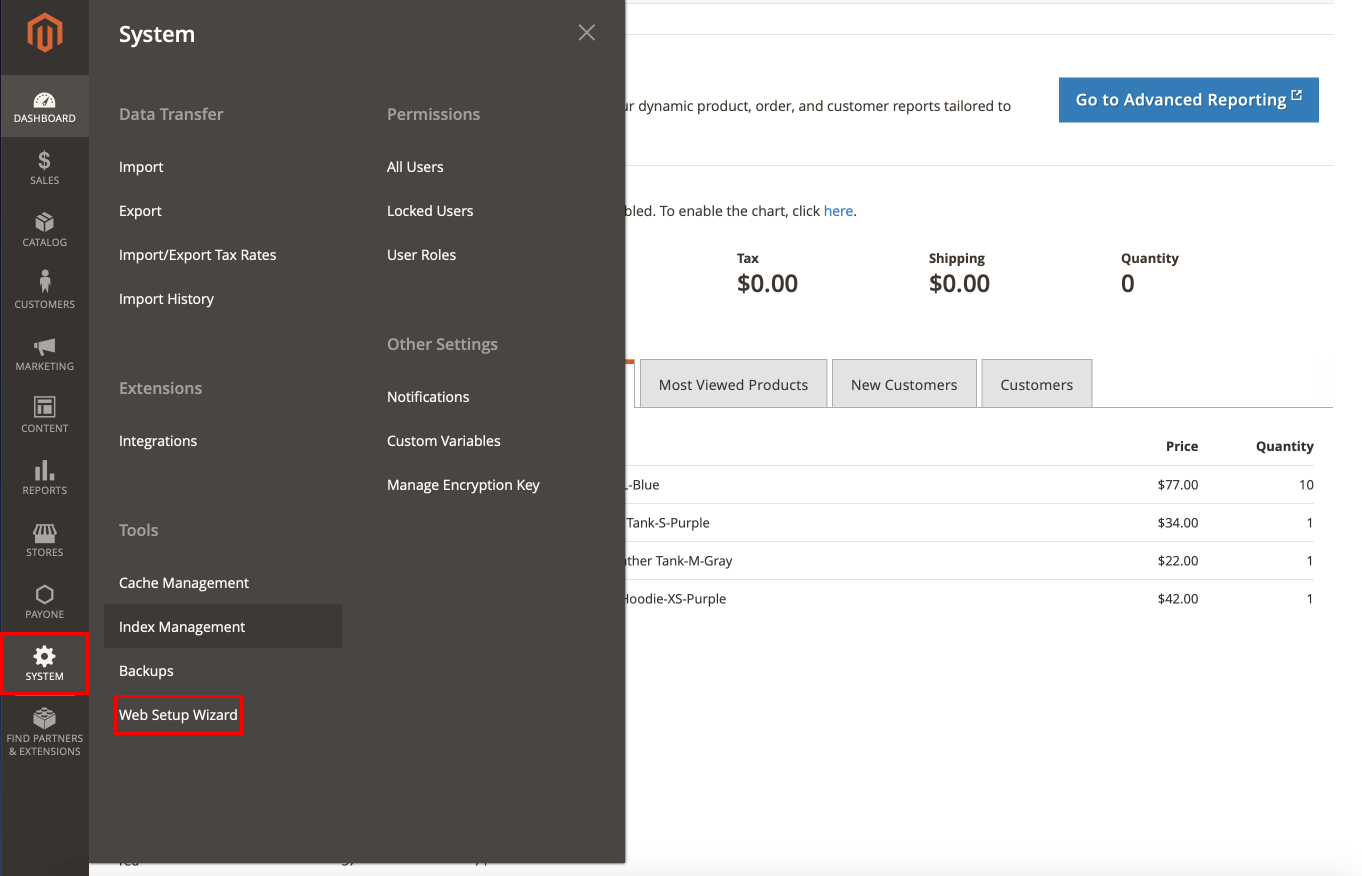
- In the System tab on the Admin sidebar, find the option Tools and choose Web Setup Wizard.
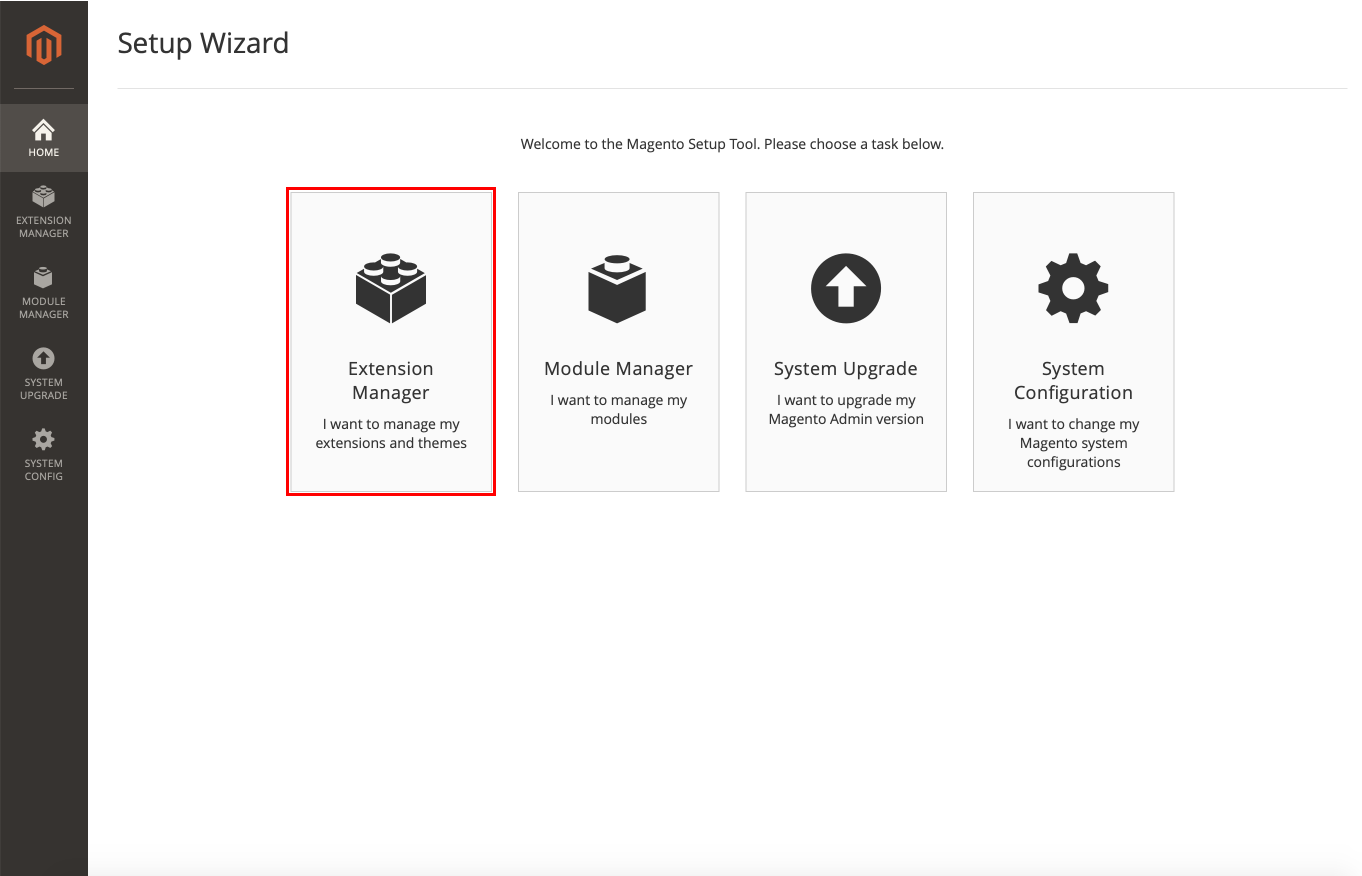
- In the opened window choose the Extension Manager option.
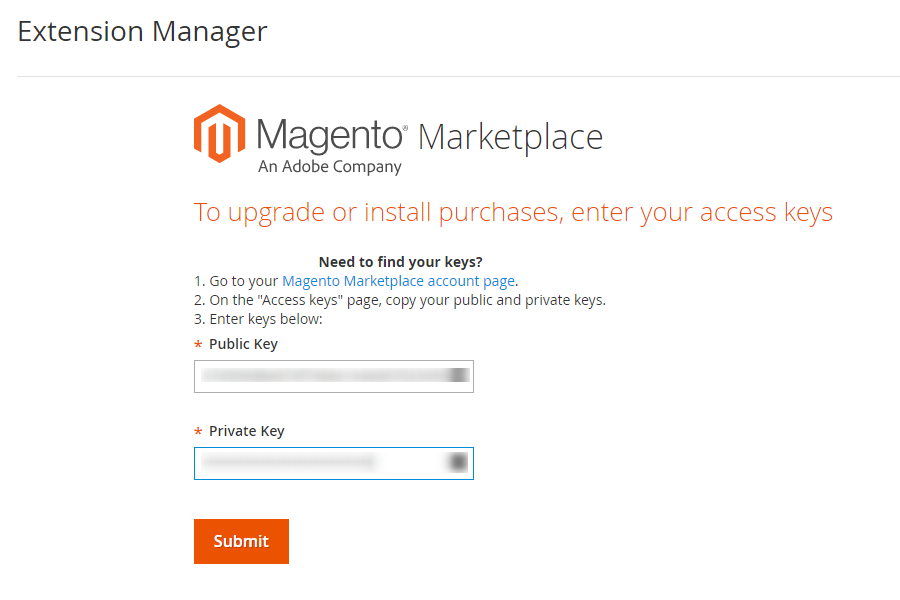
- To perform the next step, you need to know your Private and Public Access Keys that can be found in your Magento marketplace account in the Access Keys tab.
- On the opened page, copy your private and public access keys.
- Paste the copied keys into the corresponding fields in the Extension Manager of your Magento site.
- After you click Submit, you will be required to wait for a few minutes. Usually, it does not take long for Magento to generate a list of updates, purchased, and installed extensions.
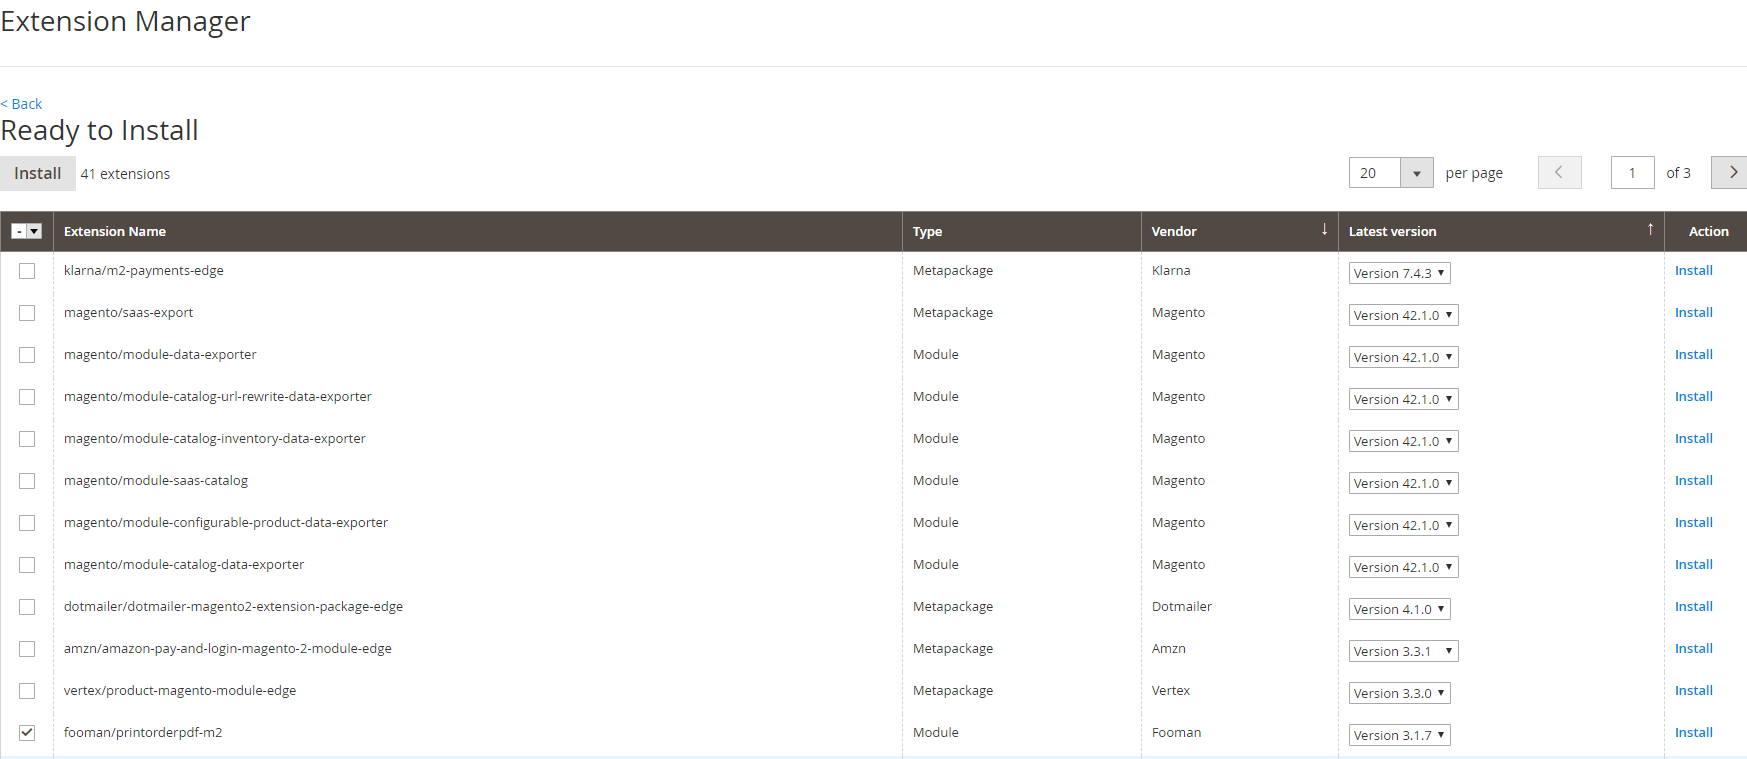
- Click Review and Install under the Extensions Ready to Install option. The list of all available extensions will be displayed.
- The Latest version column allows you to choose between the available versions of extensions. Choose the one that you need and click Install.
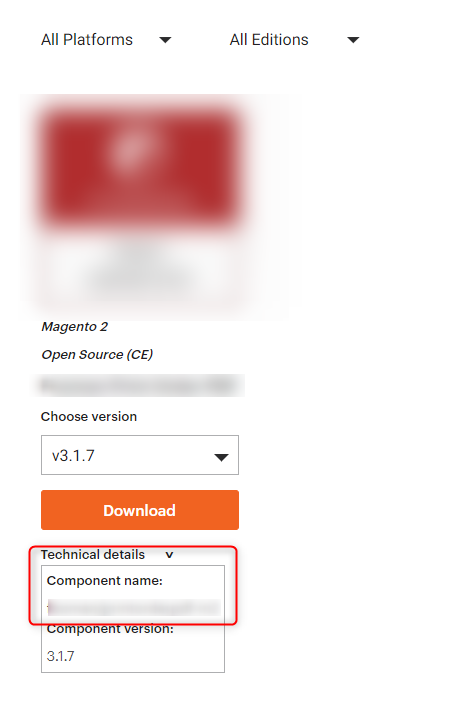
Note: If you do not know the ‘Extension name’, you can find it under ‘My purchases’ tab in your Magento Marketplace account.
- You will be redirected to the next step. Before you install the Magento extension, you need to complete the Readiness Check. Start it by clicking the Start Readiness Check button.
- Then perform the Readiness Check and Create Backup. After the process is finished, you will be able to move to extension installation. It will put your store in the offline mode, so be sure to perform it during off-peak hours.
The chosen extension will be installed automatically without further manual ado. You will get a notification when the extension is successfully installed and running.
At this stage, the work of a site manager begins. In the admin panel, look at the settings of the installed solutions, check which of the options you need in your daily routine and which should be kept disabled. Make sure that the installation process has not interfered with your store’s process.
Extension installation, if performed in the right manner – should not impact the overall performance. If you notice a speed drop, it might be a good idea to get in touch with Magento professionals who will look into the matter.
How to Install an Extension in Magento with Command Line
In Magento, there is also another way to install extensions. This is a more technically complex process that requires a store admin to work directly with the command line and store root. The overall process has the following steps:
- Purchase or get an extension on Magento Marketplace or from any third-party developer.
- You need to know the Composer name and version of the extension.
- Update the composer.json file and add the name and version of the extension you need to install.
- Make sure that the extension is installed properly.
- Configure the extension in accordance with your business needs.
If you are not sure in your knowledge and not ready to take on the risk and jeopardize the well-being of your website, it might be wise to hire a Magento development vendor that will be able to assist you with the additional configuration of your store. You can also consult with the official documentation by Magento.
Install Magento Extensions with Composer
GoMage professionals recommend installing Magento extensions with the help of Composer. You can do it by following the instructions:
- Use SSH/SFTP to log in to your server. There you will need to create a repo folder. You can create it by the following path – /www/private/magento/repo
- Copy the extension folders into the created repo folder.
- Next, you need to add extensions to the Composer. Go to Magento 2 folder and send the following command composer config repositories.module_name path /www/private/magento/repo
Module_name is the name of your extension. You can choose any name for it.
/www/private/magento/repo is the path to the created repo folder. Be sure to provide a relevant one.
- To install the extension, use the following command:
composer require companyname/[module_name][/php], where the companyname defines the name of the extension’s development company. You can check this information with the extension vendor.
If you have not run the command before, you will be asked to provide your Magento account credentials. You can find it in the My Access Key tab in the Magento marketplace. You can generate a new Access Key or use the existing one.
- This final command will finish the installation process
php bin/magento setup:upgrade]
After you have successfully finished the process and installed a Magento extension, you can move to its configuration.
How to Successfully Manage Extension Installations
In situations when a Magento store requires unique functionality, it can be added with extensions. These additional modules help to expand the standard set of features and circumvent the limitations of the system.
Here is a 3-step process for installing Magento extensions:
- Define which functionality your website lacks.
- Look for the right extension that provides the features needed.
- Decide on the method of installation or hire professional developers to do the job for you.


